 Printing cheques
Overview
Nowadays, most employees are paid by direct bank deposit, or EFT (Electronic File Transfer). However you may still pay some employees by cheque. If you have preprrinted paper with cheque coding on the top or bottom, you can print cheques with Umana.
Printed cheques are often used
- For employees who specifically request them. Legal requirements or your collective agreement may require you to offer them.
- Giving advances
- The last pay for a terminated employee
Cheque layout
Cheques are typically printed on special preprinted forms, with a detachable cheque part at the top or bottom. We may need to adjust the layout for your cheque format. These "blank cheques" are typically prenumbered.
The rest of the sheet is a simplified "pay stub". Because there is a lot of information on the pay stub, it often doesn't all fit on the same sheet of paper as a cheque.
- For that reason the “pay stub” that prints with the cheque is a simplified version.
- We recommend to email your normal pay stub to employees who get cheques, as well as those who get direct deposits.
How to print cheques
Printing cheques is like printing any other report in Umana.
Go to TOP-MENU > PRINT > NET PAY. Select CHEQUES
Select the pay period and optionally the employees.
- Select SCREEN for the destination for a start.
- When it looks right, redo this but select PRINTER
Put your cheque paper in the printer. Click PRINT.
Before printing actually happens, a list-box will open for a final confirmation. Select the employees to print & click OK.
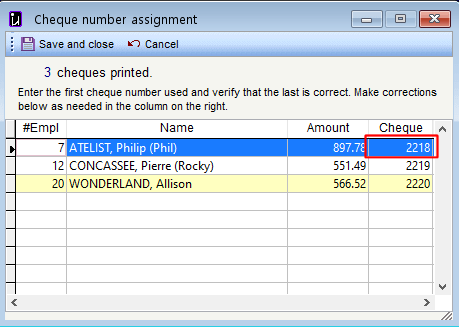
Cheque-number assignment. This records in Umana who was paid with which cheque no.
This final step only happens if you select destination = PRINTER.
Information kept in Umana
Umana tracks who should (normally) be paid by direct deposit, and who should be paid by cheque.
- This is in the PAYINFO window – where bank accounts are kept.
- You can override this and pay anyone by cheque.
Umana also tracks who was paid by cheque or direct deposit.
- This is in the NET PAY window for each employee.
- The Direct Deposit export updates this information.
- This Cheque Printing process (the last confirmation step) also updates this information.
- You can even enter the information manually in that window, even after the pay is finalized. (Just change the information there and press the SAVE icon.)
The reason for this tracking, and the dialog boxes, is to prevent you from accidentally paying the same person twice.
That can be handy for paying someone who has just left the company. One option would be to Calculate their pay early. You include it with the next regular pay period, but pay it early by cheque.
- This works well for departures. It is not a good approach for giving an employee an advance, because Umana only allows one pay per period for each employee. So you can't give an employee advance by cheque and then a direct deposit in the same period.
Later, when you are running the pay for that next period for the remainder of the employees, Umana is smart enough not to pay him again.
Cheque number assignment
After you print cheques to a printer (rather than to a file or displaying them on the screen), Umana opens a dialog box where you specify which numbers were used.
- Put the first number used in the upper right corner, and press TAB. The numbers below will follow in sequence.
- If you have a break in the sequence, you can correct numbers below.
- Click Save and close when done

Umana will start the next cheque run with the next number after the last one used. To adjust that manually go to:
- Admin > Options > Net pay > Cheque no
© Carver Technologies, 2025 • Updated: 07/06/21

 Printing cheques
