 Printing / viewing a report
Access the reports via:
Print main menu
Shortcut bar
Various navigation panes
On this page
Report selection window
Report
The drop-down list displays the available reports in the Print menu category selected. > Your favourites are displayed first by default.
- Check to see all reports.
- Click to manage your favourites.
- Click Categories on the toolbar to change category.
- Click Find on the toolbar to search for a report or import
Destination
Provides potential destinations for the report or label. There are five types available:
- Screen
- Printer
- File
- Upload to Portal
- Mass mailing
Format
Displays the selected report or label format. Three formats are possible:
- Unformatted – raw text, ugly searchable
- Formatted – the normal option for printing or viewing on the screen
- HTML
- PDF – you can use this for a file, or just viewing as a PDF
 Order...
Sets the sort order in which the records will be printed. When you check this box, a list of fields for the sort is displayed.
- You can select a field that is not displayed in the list by selecting Other... from the list. This shows the Order selection dialog box where you can select fields or create an expression to be used to sort the data in your report.
- Some reports show grouped on or more fields. Changing to an order which no longer keeps items in the group together will give undesired results.
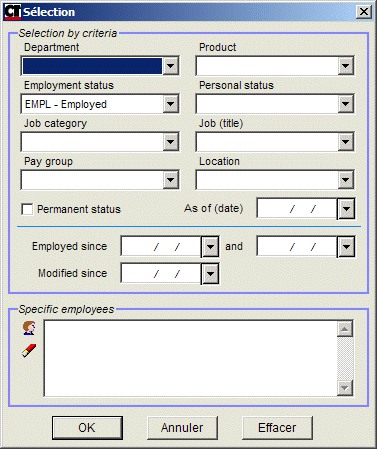
 Selection...
Identifies criteria for the report to be printed.
When you check this box, the Selection Dialog box is displayed.

In this dialog box, specify the selection of records to be displayed in the report or label. For each record, conditions are assessed and if they are met, the record will be included in the report or label. If the record does not meet these conditions, it will be excluded from the report.
 Criteria...
You can create additional selection criteria starting from the Umana expressions generator
 English
Specifies that the report or label will be in English.
 French
Specifies that the report or label will be in French.
Pages to print
- from specifies the first page number to print
- thru specifies the last page number to print
Copies
Specifies the number of report or label copies you want to print.
Selecting a printer
This dialog box is displayed when you choose the Printer destination and click the button right below.
Printer selection dialog box
Select printer
- Displays the printers currently installed on your workstation. Select the desired printer.
- Print to file
Allows you to print to file. - Preferences
Lets you to define printing options for the selected printer. - Find printer
Searches for a network printer.
Page range
- All
Prints all pages in the document. - Current page
Prints the selected page. - Pages
Prints the specified pages of the document.
Copies
- Number of copies
Allows you to specify the number of copies of the document to be printed. - Collated copies
Collates the printed copies when requesting multiple printed copies
Action buttons
Count
Extracts and counts the records instead of printing them.
- The record count is not always an employee count, because there might be multiple records extracted for one employee.
Extracts and formats the data. Then it display or prints or sends it to the destination requested.
Preview toolbar

This toolbar allows you to navigate within the preview report going to a specific page or going forward or backwards page per page.
You can change the size of the preview by zooming in and out.
If the report is what you want you may also print it from here.
Clicking on the door exits the report.
Reports that update the data base
Some reports that look for certain conditions can also update the data base.
- Clicking the PRINT button does both extraction, updating, and printing in that order!
Updating reports always give you the option of printing with or without updating.
- They may even display the proposed changes and let you select which ones to apply. This display happens before the report is printed.
Recommended approach
- Print the report first WITHOUT updating. and review the proposed changes.
- Once everything looks good, re-print the report WITH updating.
Report Troubleshooting
- Hold CTRL while clicking PRINT. After the data is extracted and sorted, but not yet formated and printed, Umana will display the raw cursors (data extracted) used you produce the report.
See also
Customizing and creating reports | Order selection dialog | Umana Standard reports | Emailing a report | Troubleshooting, Debugging tools© Carver Technologies, 2025 • Updated: 09/26/21

 Printing / viewing a report
