 Users: Logon authentication
User Authentication
Umana authenticates users by User-id and password, when they open Umana. This help topic goes into depth about how this works.
First read about Umana security concepts
You can add additional security by setting up Multi-Factor Authentication — forcing a user to confirm his identity on another device he owns, such as a smartphone, in order to access Umana. (This can be a small nuisance, like a second lock on a door.)
On the other handle, you can simplify the processes of login on to Umana with Single Sign-on options.
Authentication is required for both the desktop access and web access, but you can configure the rules separately. The same user-id and passwords are use on both platforms.
Who has access?
Umana is accessible to any active employee with a valid User-id and password.
The User-id is specified in his employee (PERS) record. The definition of active is configurable also.
- For desktop access, the user needs access to a network connected computer, or to a remote desktop RDP or equivalent.
- For web access you must have Umana web activated on your server.
Configuration
You configure global rules about authentication in Umana at Administration > Options > Security. See also Multi-factor authentication below.
You parameterize and control individual user / employee access in the Users Module.
Sign-on (log-on) process
Computer or IP-address lock-out
The first thing Umana does is checks that the computer or IP address is not locked out. Too many failed log-on attempts will cause the computer or IP address to be locked out for 2 hours. (It can be manually locked out permanently.)
- If the computer or IP address is not locked out, advance to the next step.
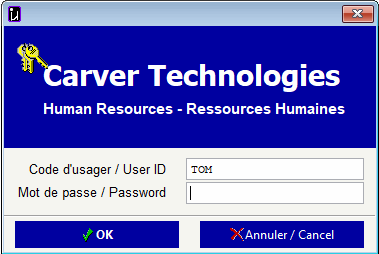
Log-on (sign-on) window
The logon-on window (below) the first first one the user sees when opening Umana. (This step may be bypassed if single sign-on is activated. See below.)

ID and password validation
The User id entered must match a single employee or be a in the USERS list. If the associated employee is terminated the logon is not accepted.
The Password is validated...
First against the password in the USER or employee record. If it matches, the user-id and password are accepted
Next, if the employee uses the DEFAULT user profile, the password entered is checked against in the DEFAULT profile in USERS. Never share this password! It is essentially a master password for employees with the default user profile.
If the Accept employee's Windows password option is checked in Configuration, then Umana checks User-id and password entered against Windows (Active Directory). If they match, then the user-id and password are accepted.
(The nice thing about this last approach it that avoids double password management on the user's part. However, checking against the Windows password adds a few seconds to the process.)
Multi-factor authentication (MFA)
If MFA is turned on, and the user is not coming from a recently trusted location, the Multi-factor authentication will be required. See below.
Single Sign-on
Users accessing Umana desktop platform locally have (normally) already logged on to Windows.
If their Windows User-id matches their Umana User-id, you can have Umana skip the logon-process completely. This is called Single Sign-on and is configured in Administration > Options > Security > Logon > Bypass logon screen (Single Sign-on)
- Before skipping the logon screen, Umana verifies the user has logged on to Windows (active Directory), and validates he is logging on from the configured network domain.
The Accept employee's Windows password option (see configuration) is similar, but instead of bypassing the logon completely, it accepts the user's Windows as valid for Umana.
Multi-Factor Authentication
About MFA
Multi-factor authentication (MFA) means requiring the user to also validate on a second device (which a would-be hacker would not have). MFA is requested only after the user has first entered a valid ID and password.
Google research shows that SMS is an effective form of authentication, helping "block 100% of automated bots, 96% of bulk phishing attacks, and 76% of targeted attacks"
Verification messages are sent via Twilio messaging services.
Verification channels
Umana uses information from the employee's dossier to determine where to send a verification request. The possible options are
- To the employee's cell phone (via SMS text messaging)
- To the employee's personal email
- To the employee's work email
- To the employee's office phone (via automated phone call)
You can configure the default channel (see below).
- If a user does not receive a message and requests that Umana send it via a different channel, that new channel become his new default channel
- Of course, if all of the above information is missing from an employee's PERS record, Umana cannot do MFA for that employee. For that same reason, MFA is not available for USER IDs not associated with a specific employee.
Configuring MFA
You configure MFA in Umana in Administration > Options > Security > Multi-Factor.
You configure MFA separately by access source: Local desktop, Remote desktop (RPD), Software as a service (SaaS), Umana Web.
- For each of these you can require MFA... Always, Never, or a After x days from a trusted device.
You can configure the default channel for MFA. If the necessary information is missing from employee's PERS record Umana will try to select another channel.
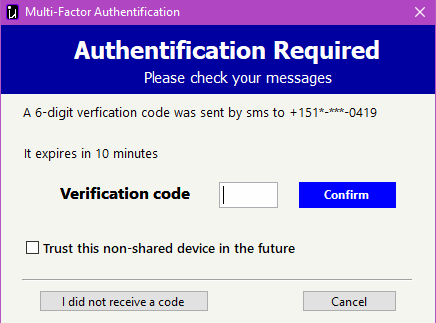
MFA confirmation window
If MFA is required, the window below is displayed and the initial verification message is sent. The user has 10 minutes to enter his verification number. (When MFA is not required, a user has 1 minute enter his ID and password.)
- If necessary, the user can request the verification code be resent or sent via another channel.
- The window is displayed and message is sent in the language he last used in Umana.

Controlling user access
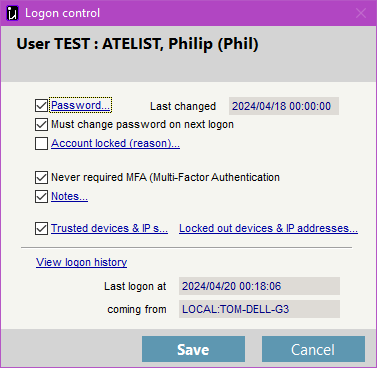
The window shown below displays login control information available for employees with a Used-Id. You can use it to lock or unlock an account or a device/IP-address.
- You can display this window by clicking on the Logon Control button on the USERS window.
- You can also display this window by clicking on the button on the PERS window. It is on the 2nd tab next to the user-id field.
- This window is only available to for USERS connected to an employee. It is also only available if you (the logged on user) have update rights to USERS.

See also
Users: input screen | Security© Carver Technologies, 2025 • Updated: 04/21/24

 Users: Logon authentication
